
Are you ready to unlock the full potential of one of the most agile fighters in the game? This guide is your ultimate resource for mastering the best moveset and item combinations for 2025. Whether you’re a seasoned player or just starting, this guide will help you dominate the battlefield.
Leafeon’s role as a Speedster makes it a unique and versatile choice. This guide dives into both offensive and defensive strategies, ensuring you’re prepared for any situation. From its powerful blade moves to its incredible speed, you’ll learn how to maximize its strengths.
We’ll also cover essential details like pricing and role specifics, so you can make informed decisions. Whether you’re aiming for quick strikes or sustained battles, this guide has you covered. Let’s get started on your journey to becoming a Leafeon expert!
Key Takeaways
- Learn the best moveset for Leafeon in 2025.
- Discover the most effective item builds for offense and defense.
- Understand Leafeon’s unique role as a Speedster.
- Get insights into pricing and role details.
- Master strategies to dominate the battlefield.
Introduction & Overview
Ready to take your gameplay to the next level with a fresh 2025 strategy? This guide is designed to help you master the latest updates and dominate the battlefield. Whether you’re a seasoned player or just starting, you’ll find actionable tips to enhance your performance.
What This Guide Covers
This guide dives into the best strategies for maximizing your attack and damage output. You’ll learn how to choose the right moves and items to stay ahead of the competition. We’ll also break down gameplay strategies step by step, so you can apply them in real-time.
Understanding the importance of level progression and timing is key. This guide covers both theoretical and practical aspects, ensuring you’re prepared for any situation. Plus, it’s based on verified sources, so you can trust the information provided.
Why 2025 Builds Matter
2025 brings new updates that can significantly impact your gameplay. Staying updated with the latest moves and item combinations is essential for maximizing your damage potential. This guide will help you adapt to these changes and maintain a competitive edge.
Whether you’re focusing on solar-powered attacks or versatile leaf-based strategies, this guide has you covered. Follow along to unlock the full potential of your gameplay and dominate every match.
Leafeon in Pokemon Unite: Basic Information & Role
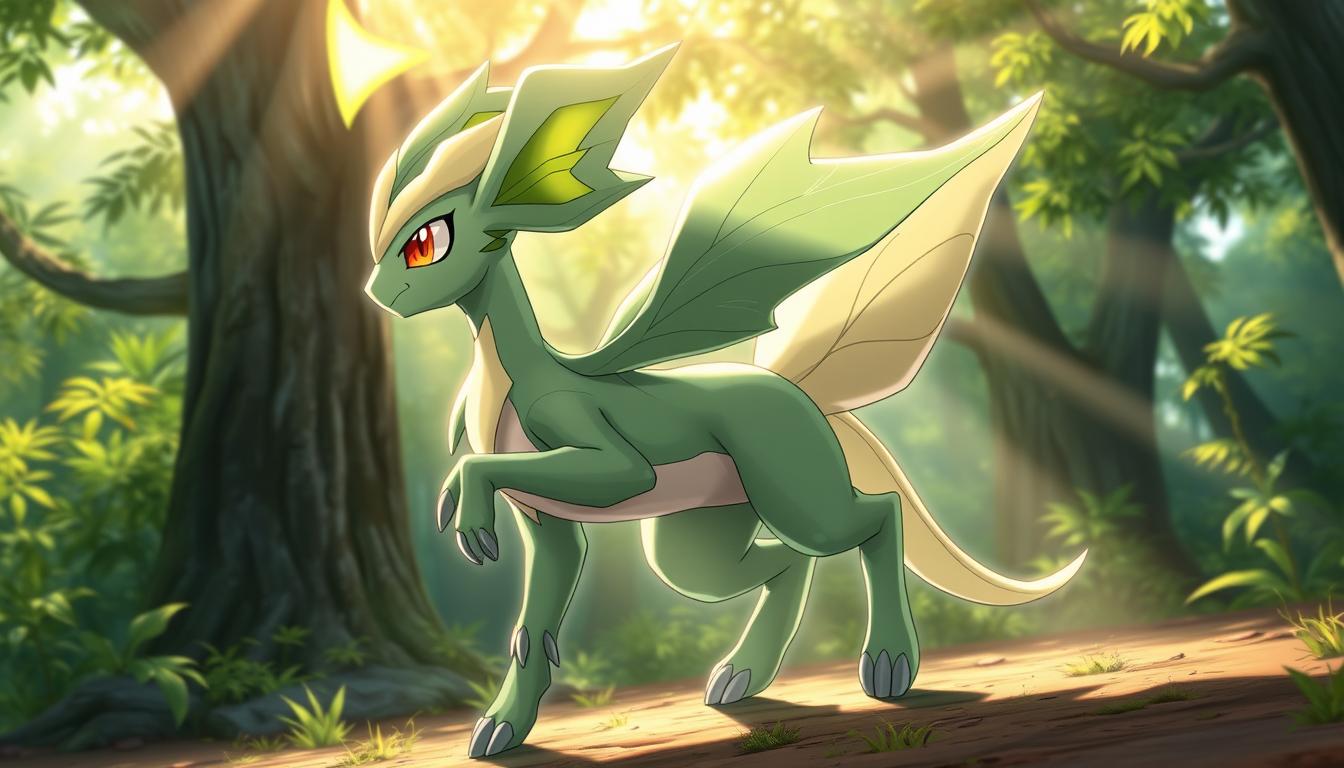
Looking to dominate the battlefield with agility and precision? Leafeon is a standout choice for players who value speed and versatility. This section covers everything you need to know about its basic stats, role, and unique playstyle.
Tier Rating, Role, and Cost
Leafeon is classified as a Speedster, making it one of the fastest characters in the game. Its tier rating places it among the top picks for players who prioritize mobility and quick strikes. To unlock Leafeon, you’ll need either 13,000 Aeos Coins or 575 Aeos Gems.
Here’s a quick breakdown of Leafeon’s base stats:
| Stat | Level 1 | Level 15 |
|---|---|---|
| HP | 3100 | 6250 |
| Attack | 160 | 660 |
| Defense | 40 | 290 |
| Speed | 3650 | 4250 |
Unique Playstyle of the Speedster
What sets Leafeon apart is its blend of offense and mobility. Its Chlorophyll ability boosts movement speed when the gauge is full, allowing for quick repositioning during battles. This makes it a formidable opponent in both early and late-game scenarios.
Leafeon’s move set, including Solar Blade and Razor Leaf, offers flexibility in combat. Whether you’re focusing on high-damage attacks or versatile strategies, this character adapts to various playstyles. Its early evolution at Level 4 also gives it an edge in the early game.
Choosing Leafeon for the right lane can significantly impact your performance. Its speed and agility make it ideal for securing objectives and pressuring opponents. Stay tuned for a deeper dive into its abilities and strategies in the next sections.
Understanding Leafeon’s Abilities and Moves
Curious about how to maximize Leafeon’s unique abilities? This section breaks down its core mechanics, helping you master its basic attack, boosted attack, and signature abilities. By understanding these details, you’ll gain a competitive edge in every match.
Standard and Boosted Attacks
Leafeon’s basic attack is quick and effective, but it’s the boosted attack that truly shines. When the chlorophyll gauge is full, your next basic attack becomes a boosted attack, dealing extra damage and slowing the enemy. This mechanic rewards precise timing and strategic planning.
For example, using Leaf Blade with a full gauge reduces its cooldown, allowing for more frequent use. This synergy between abilities and attacks makes Leafeon a versatile and powerful choice.
Key Abilities: Chlorophyll and Unite Move
The chlorophyll gauge is central to Leafeon’s playstyle. When full, it boosts movement speed, making it easier to reposition during battles. This ability pairs perfectly with its Unite Move, which enhances attack power and provides additional utility.
Leafeon’s Unite Move also interacts with its boosted attack mechanics, amplifying damage output. For instance, combining Razor Claw with a full gauge can turn the tide of a fight. Mastering these mechanics ensures you’re always one step ahead of your opponents.
Deep Dive into Leafeon Moves: Solar Blade vs Razor Leaf
Discover the strengths and weaknesses of Leafeon’s key moves. Whether you’re aiming for burst damage or versatility, understanding the mechanics of Solar Blade and Razor Leaf is crucial. Let’s break down how these moves work and when to use them.

Solar Blade: Mechanics and Benefits
Solar Blade is a chargeable attack that delivers high burst damage. When paired with a full Chlorophyll gauge, it reduces cooldown time, allowing for more frequent use. This move is perfect for players who prefer quick, powerful strikes.
Here’s a quick look at its mechanics:
| Aspect | Details |
|---|---|
| Damage | 125 (charged) |
| Cooldown | 9 seconds |
| Energy Requirement | High |
For example, combining Solar Blade with Razor Claw can maximize damage output, making it ideal for taking down high-health targets.
Razor Leaf: Versatility and Usage
Razor Leaf is a versatile move that deals consistent damage and has recast potential. It’s great for players who value adaptability in combat. This move shines in prolonged battles, where its low energy cost and quick cooldown keep you in the fight.
Key features of Razor Leaf include:
- Damage: 55 per hit
- Cooldown: 5 seconds
- Energy Requirement: Low
Pairing Razor Leaf with Aerial Ace can create a deadly combo, especially when dealing with multiple opponents. Its versatility makes it a reliable choice for both beginners and experienced players.
In summary, Solar Blade excels in burst damage, while Razor Leaf offers adaptability. Choose the move that aligns with your playstyle and dominate the battlefield.
Mastering the Chlorophyll Gauge and Game Strategy
Discover the secrets to mastering the Chlorophyll gauge. This mechanic is key to maximizing your performance in battle. By understanding how to manage it, you can optimize your damage output and stay ahead of the competition.
Managing the Chlorophyll Charge
The Chlorophyll gauge is a unique feature that boosts your movement speed when full. To charge it, focus on landing basic attacks and using abilities like Razor Leaf. Keeping the gauge full ensures you’re always ready for quick repositioning.
Here are some tips for effective gauge management:
- Use Razor Leaf to charge the gauge faster.
- Avoid wasting energy when the gauge is already full.
- Monitor the gauge’s cooldown to plan your next move.
Optimal Timing for Boosted Attacks
When the Chlorophyll gauge is full, your next basic attack becomes a boosted attack. This deals extra damage and slows enemies, making it a powerful tool in combat. Timing is everything—use it when you need to secure a kill or escape a tough situation.
Here’s how to make the most of your boosted attacks:
- Combine them with abilities like Solar Blade for maximum damage.
- Use them to disrupt enemy movements and gain the upper hand.
- Plan your attacks around the gauge’s cooldown to maintain pressure.
By mastering these strategies, you’ll dominate the battlefield with precision and timing. Keep practicing to perfect your approach!
Comprehensive pokemon unite leafeon build Explanation
Want to dominate every match with a well-crafted strategy? This section breaks down the optimal build, focusing on movesets, items, and the perfect balance between aggression and mobility. By understanding these components, you’ll be ready to outplay your opponents in every battle.
Build Components: Movesets and Items
The right combination of moves and items can make or break your performance. For example, pairing Solar Blade with Razor Claw maximizes damage output, while Razor Leaf offers versatility in prolonged fights. Here’s a breakdown of the core components:
| Component | Details |
|---|---|
| Solar Blade | High burst damage, reduced cooldown with full Chlorophyll gauge |
| Razor Leaf | Consistent damage, low energy cost, recast potential |
| Attack Weight | Boosts attack power with each stack |
| Float Stone | Increases movement speed and energy efficiency |
Using Attack Weight early in the game allows you to scale your damage as the match progresses. Meanwhile, Float Stone enhances mobility, making it easier to reposition during battles. These items synergize perfectly with Leafeon’s playstyle.
Balancing Aggression and Mobility
Leafeon’s strength lies in its ability to strike quickly and retreat just as fast. To master this, you need to balance aggression with smart positioning. For instance, using Solar Blade for quick kills while relying on Float Stone to escape tight situations ensures you stay in control.
Here are some tips for maintaining this balance:
- Use Razor Leaf for consistent damage in team fights.
- Save boosted attacks for critical moments to secure kills or escape.
- Monitor the Chlorophyll gauge to maximize movement speed and cooldown reduction.
By mastering these strategies, you’ll dominate the battlefield with precision and adaptability. Keep practicing to perfect your approach!
Detailed Held Items & Battle Items Guide
Want to boost your performance with the best items and strategies? This guide dives into the essential Held and Battle Items that can elevate your gameplay. Whether you’re focusing on damage, mobility, or versatility, the right items can make all the difference.
Item Tier List and Effects
Choosing the right items is crucial for maximizing your potential. Here’s a breakdown of the top-tier items and their effects:
| Item | Effect |
|---|---|
| Attack Weight | Boosts attack power with each stack |
| Float Stone | Increases movement speed and energy efficiency |
| Razor Claw | Enhances critical hit damage |
| Energy Amplifier | Reduces cooldown for special moves |
For example, Attack Weight is ideal for scaling damage, while Float Stone enhances mobility. These items work together to create a balanced and effective build.
Recommended Held and Battle Items
Here are the top recommendations based on damage testing and synergy:
- Attack Weight + Float Stone: Perfect for balancing damage and mobility.
- Razor Claw + Energy Amplifier: Maximizes critical hits and reduces cooldowns.
- Muscle Band + Razor Claw: Offers consistent damage and versatility.
Damage tests show that Attack Weight with 6 stacks and Energy Amplifier delivers 3982 damage, making it a top choice for burst damage. Meanwhile, Razor Claw paired with Muscle Band provides 3117 damage, ideal for sustained fights.
Emblems also play a key role. A combination of 6 Brown Emblems for damage and 6 White Emblems for additional HP can significantly enhance your performance. These choices ensure you’re prepared for any battle scenario.
By selecting the right items and understanding their synergy, you’ll dominate the battlefield with precision and adaptability. Keep experimenting to find the perfect setup for your playstyle!
Tips & Tricks for Leveling and In-Match Progression
Looking to level up quickly and dominate every phase of the match? This section provides proven strategies to help you maximize your performance from start to finish. Whether you’re focusing on early-game leveling or late-game positioning, these tips will give you the edge you need.

Early Game Leveling Strategies
In the early game, focus on defeating wild Pokémon to gain experience quickly. Prioritize securing objectives like Regieleki or Registeel, as they provide significant damage and movement advantages. Use abilities like Solar Blade to clear camps efficiently and maintain pressure on your opponents.
Here are some key tips for early-game success:
- Farm wild Pokémon to reach Level 4 as fast as possible.
- Use Aerial Ace to secure last hits on objectives.
- Stay mobile with Float Stone to avoid enemy ganks.
Late Game Positioning and Combos
In the late game, positioning is crucial. Use your movement speed to flank enemies and execute powerful combos. For example, pairing Solar Blade with Aerial Ace can deal massive damage to high-priority targets. Always keep an eye on the map to avoid getting caught out of position.
Here’s how to dominate late-game fights:
- Use boosted attacks to slow enemies and secure kills.
- Focus on team fights to maximize your impact.
- Adapt your strategy based on the flow of the match.
By mastering these strategies, you’ll dominate every phase of the game. For additional insights, consider watching video guides to refine your skills. Keep practicing and adapting to stay ahead of the competition!
Emblem Synergy: Enhancing Your Damage Output
Ever wondered how to maximize your damage output with the right emblem setup? Emblem synergy is a game-changer, allowing you to boost both your attack power and sustain. By carefully selecting and combining emblems, you can significantly improve your performance in every match.
Boost Emblem Combinations
One of the most effective emblem combinations for increasing damage is 6 Brown and 6 White emblems. This setup enhances your attack while providing additional HP for survivability. For example, Brown emblems focus on maximizing move damage, while White emblems add bulk to your character.
Here’s how this combination works:
- 6 Brown Emblems: Increase move damage by up to 12%.
- 6 White Emblems: Add 120 HP, improving your sustain in battles.
This setup ensures you’re both powerful and durable, making it ideal for aggressive playstyles.
Stat Prioritization for Leafeon
Proper stat allocation is key to maximizing your damage potential. Focus on enhancing your attack and managing your gauge effectively. For instance, pairing Razor Claw with a full gauge can turn your next basic attack into a devastating blow.
Here are some tips for stat prioritization:
- Use Attack Weight to scale your attack power as the match progresses.
- Monitor your gauge to time your next basic attack for maximum impact.
- Adjust your emblem loadout based on the flow of the match.
By mastering these strategies, you’ll dominate the battlefield with precision and adaptability. Minor adjustments to your emblem setup can lead to significant damage improvements, giving you the edge in every fight.
Leafeon Build Variants: The Solar Blade Build
Ready to dominate with precision and power? The Solar Blade Build is your go-to strategy. This variant focuses on maximizing burst damage while maintaining mobility, making it a top choice for aggressive players. Let’s break down its core components and how to make it work for you.
Core Items and Moves
The Solar Blade Build revolves around high-damage moves like Solar Blade and Leaf Blade. These abilities deliver quick, powerful strikes that can turn the tide of any battle. Pair them with Aerial Ace for added versatility and mobility.
Here’s a quick look at the core items:
- Attack Weight: Boosts attack power with each stack.
- Float Stone: Increases movement speed for better positioning.
- Energy Amplifier: Reduces cooldowns for more frequent ability use.
Situational Adjustments
This build excels in scenarios where quick, decisive strikes are needed. For example, pairing Solar Blade with Razor Claw maximizes burst damage, making it ideal for taking down high-health targets. Testing shows this combo can deliver up to 3982 damage in optimal conditions.
Here are some situational tweaks to consider:
- Use Leaf Blade for consistent damage in prolonged fights.
- Swap Float Stone for Muscle Band if you need sustained damage.
- Adjust your emblem setup to prioritize attack power or survivability.
By mastering the Solar Blade Build, you’ll dominate the battlefield with precision and adaptability. Experiment with different item combinations to find the setup that works best for your playstyle.
Exploring Alternative Builds: The Double Leaf Build
Ready to explore a fresh approach to maximize your damage output? The Double Leaf Build offers a unique playstyle that focuses on relentless attacks and adaptability. Unlike the Solar Blade variant, this build emphasizes consistent damage and versatility, making it a great choice for players who enjoy prolonged battles.
Move and Item Differences
The Double Leaf Build revolves around spamming Leaf Blade and Razor Leaf for sustained damage. While the Solar Blade variant excels in burst damage, this build shines in scenarios where consistent pressure is needed. For example, Leaf Blade provides reliable damage with a shorter cooldown, allowing you to stay active in fights longer.
Here’s a quick comparison of the key moves:
| Move | Damage | Cooldown |
|---|---|---|
| Leaf Blade | 80 | 6 seconds |
| Razor Leaf | 55 | 5 seconds |
Item choices also differ significantly. The Double Leaf Build relies heavily on Razor Claw to enhance critical hits and reduce cooldowns. Pairing it with Attack Weight boosts your attack power, ensuring you scale well as the match progresses. This combination allows you to maintain pressure while staying mobile.
Timing and Cooldown Management
Timing is crucial in the Double Leaf Build. With shorter cooldowns on Leaf Blade and Razor Leaf, you can chain attacks more frequently. This build rewards players who can manage their abilities effectively and adapt to the flow of the match.
For instance, using Leaf Blade immediately after Razor Leaf maximizes damage output. This combo is especially effective in team fights, where consistent damage can turn the tide. Keep an eye on your cooldowns to ensure you’re always ready to strike.
Advantages in Different Matchups
The Double Leaf Build excels in matchups where sustained damage is key. It’s particularly effective against tanky opponents who rely on high health pools. By chaining Leaf Blade and Razor Leaf, you can whittle down their health over time.
This build also performs well in objective-focused scenarios. For example, securing Zapdos or Drednaw becomes easier when you can consistently deal damage without waiting for long cooldowns. This adaptability makes the Double Leaf Build a versatile choice for various situations.
Is This Build Right for You?
If you enjoy a playstyle that focuses on consistent damage and adaptability, the Double Leaf Build is worth trying. It’s ideal for players who prefer prolonged battles and strategic ability management. Experiment with the build in different scenarios to see how it fits your playstyle.
By mastering the Double Leaf Build, you’ll dominate the battlefield with precision and versatility. Keep practicing to perfect your approach and adapt to any situation!
Build Variants Spotlight: The Razor Leaf Build
Want to master a build that combines speed and precision? The Razor Leaf Build is a versatile strategy that focuses on consistent damage and adaptability. This variant is perfect for players who enjoy prolonged battles and strategic ability management.
Core Strategy and Positioning
The Razor Leaf Build thrives on precise positioning and timing. By spamming Razor Leaf and Leaf Blade, you can maintain constant pressure on your opponents. This build is particularly effective in team fights, where consistent damage can turn the tide.
Here’s how to maximize your impact:
- Use Razor Leaf to deal consistent damage and charge your gauge faster.
- Pair it with Aerial Ace for added mobility and burst potential.
- Focus on securing objectives like Zapdos to amplify your team’s advantage.
Item Synergy and Damage Output
Items like Attack Weight and Razor Claw are essential for this build. Attack Weight scales your damage as the match progresses, while Razor Claw enhances critical hits. Together, they create a powerful combination that keeps you ahead in every battle.
Damage tests show that pairing Razor Claw with Attack Weight can deliver up to 743 damage per hit. This makes the Razor Leaf Build a reliable choice for both beginners and experienced players.
Why This Build Stands Out
What sets the Razor Leaf Build apart is its adaptability. Whether you’re facing tanky opponents or securing objectives, this build excels in various scenarios. Its emphasis on consistent damage and strategic ability usage makes it a top pick for players who value versatility.
By mastering this build, you’ll dominate the battlefield with precision and adaptability. Experiment with different item combinations to find the setup that works best for your playstyle!
Optimizing Damage: Testing and Analysis
Curious about how to maximize your damage output with precise testing and analysis? This section dives into detailed test results and insights, helping you understand how different item combinations and move usages impact performance. Whether you’re focusing on burst damage or sustained fights, these findings will guide your strategy.
Damage Test Insights
Testing in practice mode revealed significant differences in damage output based on item choices. For example, pairing Attack Weight with Energy Amplifier delivered a maximum of 3982 damage, while Razor Claw combined with Muscle Band provided 3117 damage. These results highlight the importance of selecting the right items for your playstyle.
Here’s a breakdown of key test results:
| Item Combination | Damage Output |
|---|---|
| Attack Weight + Energy Amplifier | 3982 |
| Razor Claw + Muscle Band | 3117 |
| Float Stone + Attack Weight | 951 |
Cooldown management also plays a crucial role. Moves like Emerald Two benefit from reduced cooldowns, allowing for more frequent use. Proper timing ensures you’re always ready to strike, maximizing your attack potential.
Energy and Move Timing
Energy management is another critical factor. Moves that require high energy can drain your resources quickly, so it’s essential to balance usage. For instance, using Solar Blade with a full gauge reduces its cooldown, enabling more frequent high-damage attacks.
Here are some tips for optimizing your setup:
- Use Attack Weight early to scale your damage as the match progresses.
- Pair Float Stone with high-mobility moves for better positioning.
- Monitor your energy levels to avoid running out during critical moments.
By mastering these strategies, you’ll dominate the battlefield with precision and adaptability. Experiment with different setups to find what works best for you!
Conclusion
Mastering the right strategies can elevate your gameplay to new heights. This guide has covered everything from optimal moves like Leaf Blade and Solar Blade to the best item combinations for maximum attack potential. Whether you’re focusing on burst damage or sustained fights, these insights will help you dominate the battlefield.
Experimentation is key to finding the perfect setup. Try out different builds and adjust them based on your playstyle. Watching video guides can also provide additional tips and tricks to refine your skills.
Understanding the data behind damage tests ensures you’re always one step ahead. By analyzing the numbers, you can make informed decisions that enhance your performance. Thank you for exploring this guide, and we invite you to share your experiences and strategies with the community.
Remember, continuous improvement is the path to success. Keep practicing, adapting, and experimenting to stay ahead of the competition. Your journey to mastery starts now!
Leave a Comment